3-State Rollover Button Sample
| Although not providing a great deal of instructions
here, I thought I would provide this page to help give some idea of
how a multi-state button can be created in Photoshop and Image Ready
for use on a web page. This was done in response to questions
seen posed in the
Adobe
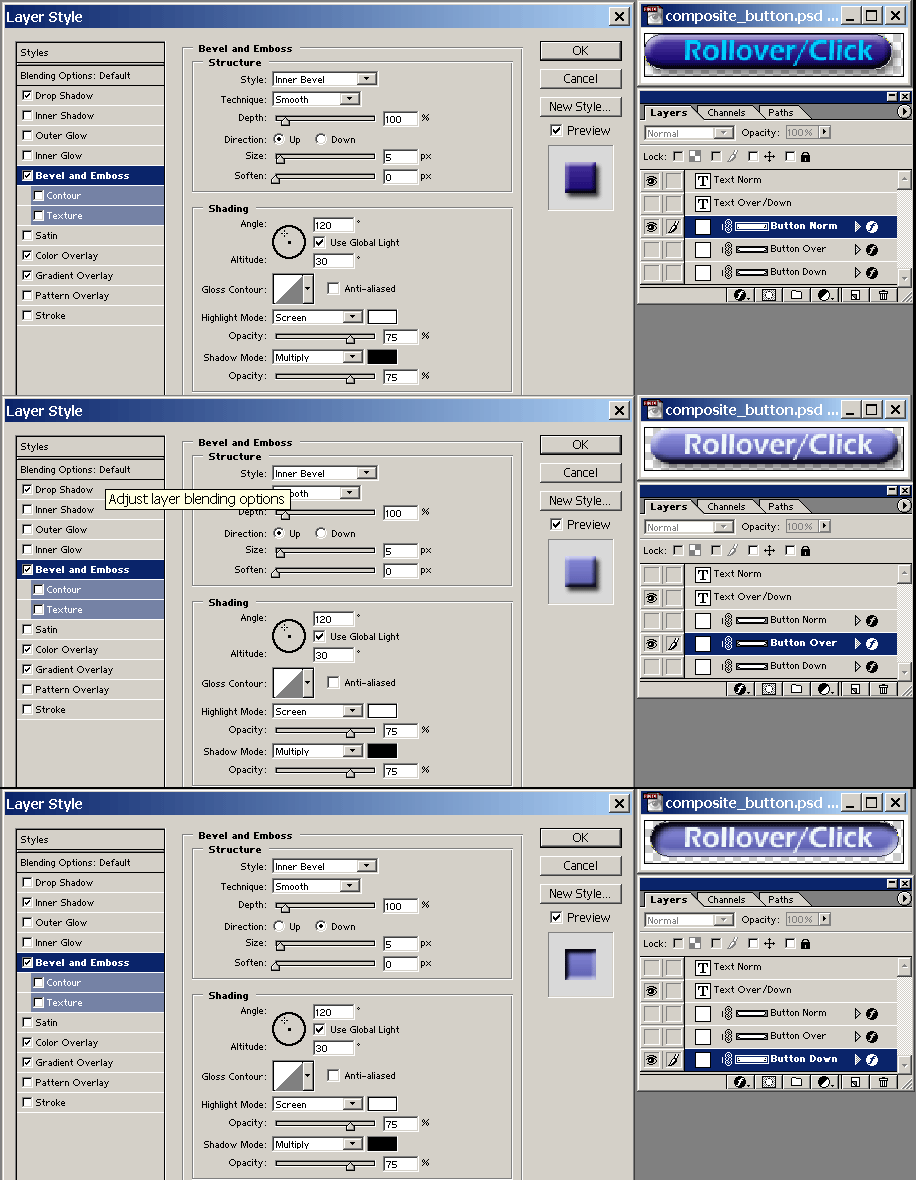
Photoshop Users Forum. The basic idea here is that one can create a multi-layered image in Photoshop, pass that image into ImageReady, and then associate one or more visible layers with a button state in the ImageReady Rollover Palette. The button above is a 3-state button, with the individual states of Normal, Over, and Down. These states can be related to the figure below which is a composite built from Photoshop screen captures, illustrating the Layer Style options that were used in creating the image for each button state, with the Bevel and Emboss options detailed. The layer visibilities shown for each button style in Photoshop are the same as would be specified in ImageReady for each button state. For the Normal state, the visible layers are the dark violet-blue button layer "Button Norm" and the "Text Norm" layer which is simply the text of the button in a sky blue color. The Over state provides a transition to a lighter button with white text and is created by hiding the "Button Norm" and "Text Norm" layers while making the "Button Over" and "Text Over/Down" layers visible. The Down state then hides the "Button Norm" layer and enables the "Button Down" layer to provide the impression of a pressed down button. Saving the Optimized file in ImageReady will automatically generate the JavaScript code and GIF images used to create the button. Meanwhile, the original Photoshop file should be saved for future use in modifying the buttons. CLICK HERE for an example of a rollover where a simple animation is also included. Another question I came across in the Photoshop forum was one from a user having difficutly changing the color of a Blue Gel rollover button created in ImageReady to some other color. While the question seemed simple in concept, the answer wasn't as obvious as I thought, once I explored it and learned the color contributions to the button were largely applied through various layer styles rather than the original color of a filled, rounded rectangle created initially on the layer. CLICK HERE to watch a Flash video where I go through changing a blue gel rollover to a red gel. |
